
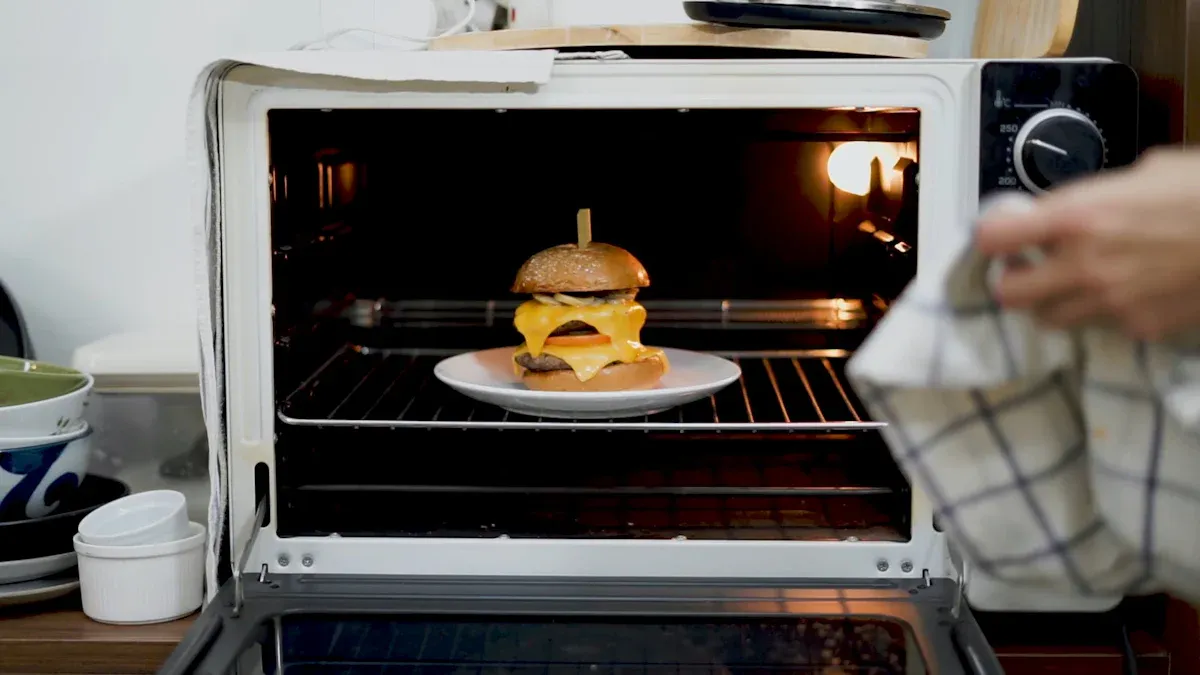
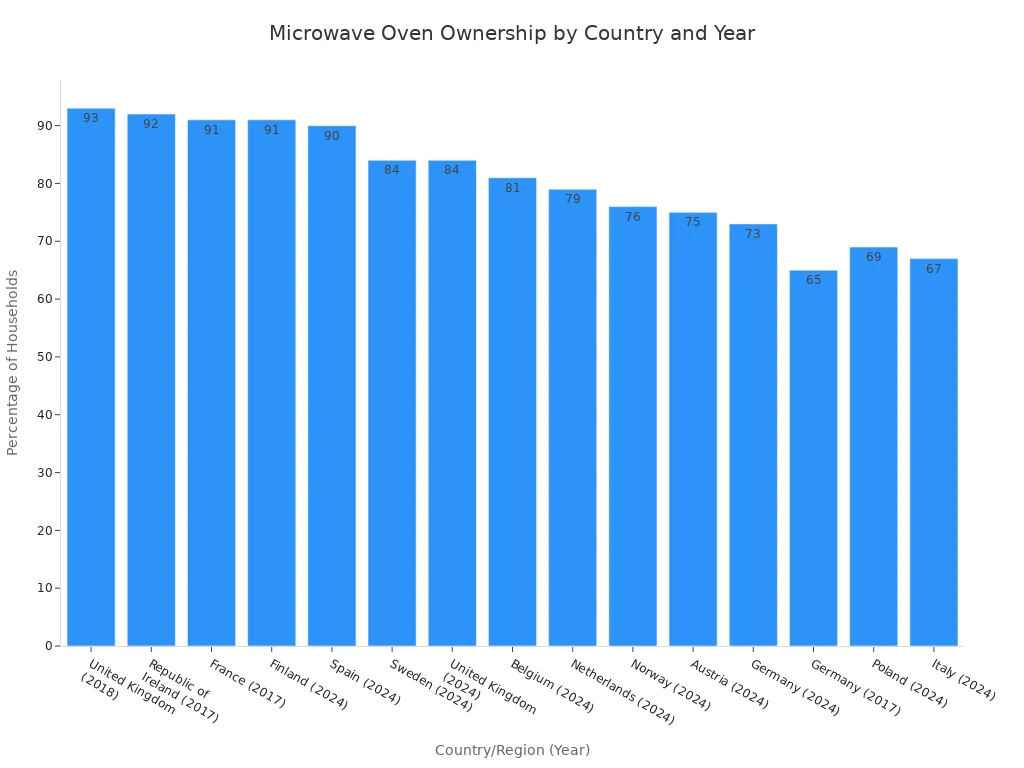
A microwave grill pan delivers smoke-free, perfectly grilled steak and crispy chicken. You can prepare these meals in under 5 minutes. This tool offers an ideal solution for quick, delicious meals. It eliminates the hassle of traditional grilling. Many households already own a microwave oven. For instance, in 2024, 91% of Finnish households and 90% of Spanish households had one.
This widespread ownership makes the microwave grill pan accessible. Discover how this innovative kitchen tool transforms your cooking experience. People often ask, “How does a microwave grill pan work?” or “Is a microwave grill pan safe?“. Some even wonder, “Can a microwave grill pan replace an air fryer?“. This article highlights the benefits of Smoke-Free Grilling and efficient Microwave Grilling.
Key Takeaways
- A microwave grill pan cooks food fast and without smoke.
- It makes crispy steak and chicken in under 5 minutes.
- This pan works for many foods, like fish, vegetables, and sandwiches.
- Always preheat the pan and do not put too much food in it.
- Clean the pan easily with a damp cloth or in the dishwasher.
The Magic Behind Your Microwave Grill Pan
What is a Microwave Grill Pan?
A microwave grill pan is a specialized cooking tool. It allows users to grill, sear, and crisp food inside a standard microwave oven. This innovative pan brings the benefits of grilling indoors. It offers a convenient way to achieve grilled textures and flavors without a traditional grill. This tool makes quick meals possible for busy individuals.
The Science of Searing: How it Heats and Grills
A microwave grill pan converts microwave energy into direct heat for searing. A special material in its base absorbs microwave energy. It transforms this energy into direct, even heat. This cooks food from the bottom up, similar to a stovetop pan. This process allows for crisping, toasting, and browning. It prevents food from becoming soggy. For example, the RANGEMATE, a type of microwave grill, converts microwave energy into infrared heat waves. A heating plate underneath the food absorbs the microwaves. This plate heats up to temperatures as high as 750°F. It then transfers the heat to a non-stick grill pan. This cooks the food directly. The lid of the RANGEMATE is made from microwave-blocking materials. This prevents microwaves from directly hitting the food. Instead, it channels the energy to the heating plate for traditional cooking.
Why Your Microwave Grill Pan is Smoke-Free
Traditional grilling often produces smoke. This happens when fats and marinades drip onto hot coals or heating elements. A microwave grill pan avoids this issue. It does not use an open flame. It also does not have exposed heating elements. The pan itself heats the food. This prevents drippings from burning and creating smoke. Users enjoy clean, smoke-free cooking. This makes it ideal for indoor use in any kitchen.
Perfect Steak in Under 5 Minutes with a Microwave Grill Pan

Achieving a perfectly seared steak in minutes is entirely possible with a microwave grill pan. This section guides users through selecting the right cuts, preparing them, and executing a quick, efficient grilling process.
Choosing the Best Steaks for Your Microwave Grill Pan
Selecting the appropriate steak cut is crucial for optimal results when using a microwave grill pan. Not all cuts are equally suitable for this rapid cooking method. Thicker cuts, such as T-bones or porterhouses, tend to cook unevenly in a microwave. Traditional pan-searing or grilling methods offer more controlled cooking for these cuts. For the microwave grill pan, thinner cuts generally perform better because of the limited cooking time. A 1-inch steak is often suggested for ideal cooking. Thicker cuts will result in a rarer steak, which may not be universally desired.
The following table outlines recommended steak cuts and their characteristics for microwave grilling:
| Cut | Thickness | Texture | Why It Works |
|---|---|---|---|
| Sirloin | Medium (around 1 inch) | Moderately tender | Cooks relatively evenly; good balance of texture and flavor without heavy marbling. |
| Ribeye | Thin to medium | Rich marbling | Fat helps keep the steak juicy even with rapid microwave heat. |
| Filet mignon | Thin slices preferred | Very tender | Microwave quickly enhances tenderness; avoid thick cuts. |
| Flank steak | Thin slices | Lean, fibrous | Cut thin against the grain to soften its chewy texture. |
Prepping for Perfection: Seasoning and Oiling
Proper preparation ensures a flavorful and well-seared steak. Begin by patting the steak dry with paper towels. This step removes surface moisture, which is essential for achieving a good sear. Moisture on the surface can steam the meat instead of searing it.
Next, season the steak generously. A simple combination of coarse salt and freshly ground black pepper works effectively. Users can also apply their favorite steak rub for added flavor complexity. Finally, lightly brush both sides of the steak with a high-smoke-point oil, such as canola or grapeseed oil. This prevents sticking and aids in the searing process. Alternatively, users can lightly oil the preheated microwave grill pan itself.
The 5-Minute Sizzle: Step-by-Step Steak Grilling
Grilling a steak in a microwave grill pan is a straightforward process that delivers impressive results in minimal time.
- Preheat the Pan: Place the empty microwave grill pan into the microwave. Heat it on high power for 2-3 minutes. This preheating step is vital for achieving a proper sear. The pan must be hot before the steak touches its surface.
- Place the Steak: Carefully remove the hot pan from the microwave. Place the seasoned and oiled steak onto the hot grilling surface. The steak should sizzle immediately upon contact.
- First Side Cook: Return the pan with the steak to the microwave. For a 1-inch steak, cook it on 50% power in a 1000-watt microwave for 4 minutes. This cooks the first side and begins the internal cooking process.
- Flip and Finish: After 4 minutes, carefully flip the steak using tongs. Return the pan to the microwave and cook for an additional 1 minute on 50% power. This second, shorter cooking period finishes the steak to a medium doneness and ensures a good sear on the second side.
- Rest the Steak: Remove the steak from the pan and place it on a cutting board. Allow it to rest for 3-5 minutes before slicing. Resting allows the juices to redistribute throughout the meat, resulting in a more tender and flavorful steak.
Following these steps ensures a perfectly cooked steak with a desirable sear, all within a few minutes.
Achieving the Ideal Sear and Doneness
Achieving the perfect sear and desired doneness elevates a steak from good to exceptional. A well-executed sear creates a flavorful, caramelized crust on the steak’s exterior. This crust adds texture and locks in the meat’s natural juices. Users can visually assess the sear. A rich, dark brown color indicates a successful Maillard reaction. This chemical process enhances the steak’s flavor profile.
Determining doneness accurately ensures a satisfying eating experience. While a meat thermometer offers the most precise measurement, users can also employ tactile methods. A rare steak feels soft and spongy. A medium-rare steak offers slight resistance. A medium steak feels firm but still yields to pressure. For those preferring a specific internal temperature, a quick-read thermometer provides exact readings.
| Doneness Level | Internal Temperature | Touch Test |
|---|---|---|
| Rare | 125-130°F (52-54°C) | Very soft |
| Medium-Rare | 130-135°F (54-57°C) | Soft, springy |
| Medium | 135-140°F (57-60°C) | Firm, slight give |
| Medium-Well | 140-145°F (60-63°C) | Very firm |
| Well-Done | 150°F+ (66°C+) | Hard |
Adjusting cooking times allows for different doneness preferences. For a rarer steak, users can reduce the initial cooking time by 30-60 seconds. For a more well-done steak, they can add 30-60 seconds to the second cooking phase. Always remember that the steak continues to cook slightly during the resting period. This carryover cooking can increase the internal temperature by a few degrees. Therefore, removing the steak just before it reaches the target temperature is advisable. Resting the steak for 3-5 minutes after cooking is non-negotiable. This crucial step allows muscle fibers to relax and reabsorb juices. Consequently, the steak remains tender and moist. The microwave grill pan facilitates this precise control, allowing users to achieve their preferred level of doneness consistently.
Crispy, Juicy Chicken: A Quick Reality with Your Microwave Grill Pan
Achieving crispy, juicy chicken quickly becomes a reality with this innovative kitchen tool. This section guides users through selecting the best chicken cuts, enhancing flavors with marinades and rubs, and executing a rapid grilling process.
Selecting Chicken Cuts for Optimal Results
Choosing the right chicken cut significantly impacts the success of microwave grilling. Thinner, boneless, and skinless cuts generally perform best. They cook more evenly and quickly. Chicken breasts and thighs are popular choices. They offer versatility and absorb flavors well.
- Boneless, Skinless Chicken Breasts: These cook quickly and provide a lean protein option. Pounding them to an even thickness (about 1/2 to 3/4 inch) ensures uniform cooking.
- Boneless, Skinless Chicken Thighs: Thighs offer more fat content, which helps them remain juicy during rapid cooking. Their natural thinness makes them ideal for quick grilling.
- Chicken Tenders: These small, uniform pieces cook very fast. They are perfect for salads or wraps.
Avoid bone-in or very thick cuts. They require longer cooking times and may not cook thoroughly or evenly in the microwave grill pan.
Marinades and Rubs for Enhanced Flavor
Marinades and rubs elevate chicken’s flavor profile. They also contribute to tenderness and moisture.
- Marinades: These liquid mixtures typically contain an acid (like lemon juice or vinegar), oil, and various seasonings. Acids help tenderize the meat. Oils prevent sticking and add moisture. Marinate chicken for at least 30 minutes, or up to 4 hours, for best results. Longer marinating times can sometimes make chicken mushy.
- Example Marinade: Combine olive oil, lemon juice, minced garlic, dried oregano, salt, and pepper.
- Rubs: Dry rubs consist of a blend of spices and herbs. They create a flavorful crust on the chicken’s surface. Apply rubs generously to all sides of the chicken. Pat them firmly onto the meat.
- Example Rub: Mix paprika, garlic powder, onion powder, brown sugar, cayenne pepper, salt, and black pepper.
Always pat the chicken dry with paper towels after marinating or applying a rub. Excess moisture hinders the searing process. A dry surface promotes a crispier exterior.
From Microwave to Mouth: Grilling Chicken in Minutes
Grilling chicken in a microwave grill pan is a fast and efficient process. It delivers delicious results with minimal effort.
- Preheat the Pan: Place the empty microwave grill pan into the microwave. Heat it on high power for 2-3 minutes. This step ensures the pan reaches a high temperature for effective searing.
- Prepare the Chicken: Lightly brush the seasoned chicken pieces with a high-smoke-point oil. This prevents sticking and aids in browning.
- Place the Chicken: Carefully remove the hot pan from the microwave. Place the chicken pieces onto the hot grilling surface. Avoid overcrowding the pan. Leave space between pieces for even cooking.
- Initial Cook: Return the pan with the chicken to the microwave. Cook on high power for 3-4 minutes. Cooking times vary based on chicken thickness and microwave wattage.
- Flip and Finish: Carefully flip the chicken pieces. Return the pan to the microwave. Cook for an additional 2-3 minutes on high power.
- Check for Doneness: Use a meat thermometer to ensure the chicken reaches an internal temperature of 165°F (74°C). The juices should run clear.
- Rest the Chicken: Remove the chicken from the pan. Let it rest on a cutting board for 2-3 minutes. Resting allows the juices to redistribute, keeping the chicken moist and tender.
This method provides perfectly grilled chicken with a desirable crispy exterior and a juicy interior. It offers a convenient solution for quick, healthy meals.
Ensuring Crispy Skin and Cooked-Through Meat
Achieving both crispy skin and thoroughly cooked meat presents a common challenge when grilling chicken. Users can master this balance with careful preparation and precise cooking techniques. This section outlines strategies for optimal results.
For crispy chicken skin, moisture removal is paramount. Chicken skin contains a significant amount of water. This water must evaporate before the skin can crisp. Users should always pat chicken pieces thoroughly dry with paper towels before seasoning or oiling. This step removes surface moisture. A dry surface promotes direct contact with the hot pan, facilitating the Maillard reaction. This reaction creates the desirable brown, crispy texture and enhances flavor. Applying a light coating of high-smoke-point oil to the skin also aids in crisping. The oil conducts heat efficiently and helps render the fat in the skin.
Proper preheating of the pan is another critical factor for crispy skin. A sufficiently hot pan immediately sears the chicken skin upon contact. This rapid searing prevents the skin from sticking and initiates the crisping process quickly. If the pan is not hot enough, the chicken will steam rather than sear, resulting in rubbery skin.
Ensuring the chicken is cooked through to a safe internal temperature is non-negotiable. Undercooked chicken poses health risks. A meat thermometer provides the most reliable method for verifying doneness. Users should insert the thermometer into the thickest part of the chicken, avoiding bones. The United States Department of Agriculture (USDA) recommends a minimum internal temperature of 165°F (74°C) for all poultry.
💡 Tip: Always check the internal temperature in multiple spots to confirm even cooking.
Visual cues also offer indicators of doneness, though they are less precise than a thermometer. Cooked chicken meat appears opaque throughout. Juices running clear when pierced with a fork suggest the chicken is done. However, relying solely on visual cues can lead to either undercooked or overcooked chicken. Overcooked chicken becomes dry and tough.
Users can manage cooking times and power settings to achieve both crispy skin and thorough cooking. Starting with a higher power setting for the initial sear helps crisp the skin. Reducing the power or adjusting cooking duration for the remainder of the cooking process ensures the interior cooks evenly without burning the exterior. Resting the chicken after cooking also contributes to juiciness. During resting, muscle fibers relax, and juices redistribute throughout the meat. This process results in a more tender and moist final product.
Beyond Steak and Chicken: Versatility of Your Microwave Grill Pan
The utility of this innovative kitchen tool extends far beyond just steak and chicken. Users discover its capability for preparing a wide array of other delicious meals. This versatility makes it an indispensable appliance for quick and healthy cooking.
Other Proteins for Your Microwave Grill Pan
This grilling tool efficiently cooks various other proteins. Fish fillets, such as salmon or tilapia, achieve a perfect sear and flaky texture in minutes. Shrimp also cooks rapidly, developing a pleasant char without becoming rubbery. Sausages and bacon crisp up beautifully, offering a convenient way to prepare breakfast items or add flavor to other dishes. The direct heat ensures even cooking and desirable browning for these diverse protein options.
Grilled Vegetables with Your Microwave Grill Pan
Grilling vegetables becomes simple and quick. Bell peppers, zucchini, and asparagus develop a tender-crisp texture and smoky flavor. Broccolini and red bell peppers also grill well, retaining their vibrant colors and nutrients. For denser vegetables like squash and potatoes, users can microwave them first. This significantly reduces their subsequent grilling time, ensuring they cook through evenly while still achieving a grilled finish. This method provides a healthy and flavorful side dish or a main course.
Quick Snacks and Sandwiches
The grill pan also excels at preparing quick snacks and sandwiches. It transforms a simple grilled cheese into a gourmet experience with perfectly toasted bread and melted cheese. Quesadillas achieve a crispy exterior and warm, gooey filling. Users can also create delicious paninis, pressing sandwiches to create warm, flattened delights with appealing grill marks. This tool offers a fast solution for satisfying cravings or preparing light meals.
Tips for Success with Your Microwave Grill Pan
Achieving consistent, excellent results with this innovative kitchen tool requires adherence to a few key practices. These tips ensure optimal performance and longevity for the appliance.
Preheating is Key for Your Microwave Grill Pan
Proper preheating is fundamental for effective searing and grilling. Users must allow the empty pan to absorb sufficient microwave energy before adding food. This step ensures the cooking surface reaches the necessary high temperature for the Maillard reaction. For general use, preheat the empty pan for 2 or 3 minutes. Specific foods benefit from tailored preheating times. For instance, searing steak requires preheating the microwave grill pan for 3 minutes on high power. When pan-frying salmon, a 2-minute preheat is sufficient. This initial heating creates the perfect environment for a crispy exterior and even cooking.
Don’t Overcrowd Your Microwave Grill Pan
Overcrowding the cooking surface is a common mistake that hinders optimal results. Placing too much food in the pan lowers its temperature. This prevents proper searing and can lead to steaming rather than grilling. Food releases moisture during cooking. Overcrowding traps this moisture, resulting in a less crispy texture. Users should arrange food in a single layer, leaving adequate space between pieces. This practice allows heat to circulate effectively around each item. It promotes even cooking and ensures a desirable sear. If preparing larger quantities, cook in batches.
Cleaning and Maintenance for Your Microwave Grill Pan
Proper cleaning and maintenance extend the lifespan of the microwave grill pan and preserve its non-stick properties. The design of these pans often features smooth, non-porous surfaces. These surfaces naturally resist food residue and grease stains. Cleaning is straightforward. A quick wipe with a damp cloth or a rinse under water typically suffices for daily cleaning. For added convenience, many models are dishwasher-safe. This feature simplifies cleanup after meals. Regular cleaning prevents food buildup and maintains the pan’s efficiency for future use.
Embrace the convenience and delicious results of smoke-free grilling. Users enjoy perfectly seared steak and crispy chicken in minutes. This tool transforms weeknight meals with minimal effort. It eliminates smoky messes. The microwave grill pan offers a practical solution for quick, healthy cooking.
FAQ
Can users use metal utensils with a microwave grill pan?
Users should avoid metal utensils. Metal can scratch the non-stick coating, reducing the pan’s effectiveness and lifespan. Silicone, plastic, or wooden utensils are safer choices. These materials protect the cooking surface during use.
Is a microwave grill pan safe for all microwave ovens?
Most microwave grill pans are designed for standard microwave ovens. Users should always check the product’s specific instructions and wattage compatibility. Ensure the pan fits properly and does not touch the microwave’s interior walls.
What materials are microwave grill pans typically made from?
Microwave grill pans often feature a special ferrite material in their base. This material absorbs microwave energy and converts it into direct heat. The cooking surface usually has a non-stick coating for easy food release and cleaning.
Can a microwave grill pan truly replace a traditional outdoor grill?
A microwave grill pan offers convenient indoor grilling and searing without smoke. It excels at quick meals like steak and chicken. However, it does not replicate the smoky flavor or large capacity of a traditional outdoor grill. It serves as a complementary tool.
How do users clean a microwave grill pan after use?
Cleaning is straightforward. Allow the pan to cool completely. Wipe it with a damp cloth or sponge. Many models are dishwasher-safe, offering added convenience. Avoid abrasive scrubbers to protect the non-stick surface.


