
Are you tired of soggy leftovers or rubbery textures when reheating food in the microwave? While the microwave is a marvel of modern convenience, it has historically struggled with “crispiness.” Enter the microwave frying pan (also known as a browning plate or microwave crisper).
Choosing the right pan requires an understanding of susceptor technology, thermal conductivity, and the specific needs of your kitchen environment—whether it’s a fast-paced commercial cafe or a busy family home. This guide breaks down everything you need to know to make an informed investment.
What Is a Microwave Frying Pan and How Does It Work?
To choose the right tool, you must first understand the science behind it. A standard microwave works by vibrating water molecules in food, creating friction and heat. However, this process does not produce the Maillard reaction (the chemical reaction between amino acids and reducing sugars that gives browned food its distinctive flavor).
The Role of Susceptor Technology
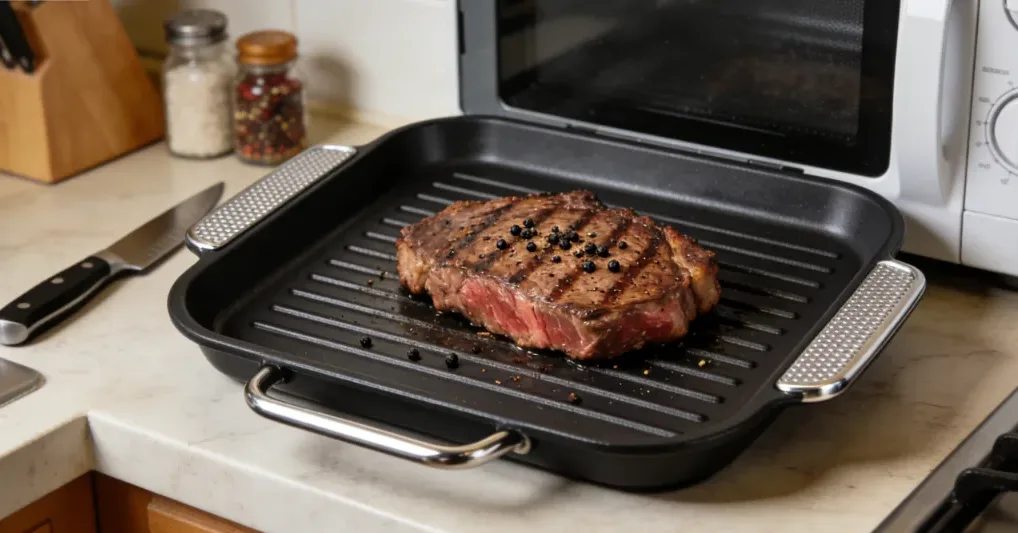
A microwave frying pan features a specialized bottom coated with ferrite or other susceptor materials.
- Energy Conversion: The susceptor absorbs microwave energy and converts it into direct radiant heat.
- Surface Temperatures: These pans can reach surface temperatures of 200°C to 250°C (400°F to 480°F) within minutes.
- Searing Action: Because the pan becomes physically hot, it sears the bottom of the food, mimicking the action of a traditional stovetop skillet.
Why Do You Need One?
Standard microwave-safe glass or plastic containers are “transparent” to microwaves. They hold the food but do not contribute to the cooking process. A microwave frying pan transforms your microwave from a simple reheating box into a versatile cooking appliance capable of frying eggs, searing steaks, and crisping pizza crusts.
How Do Home and Commercial Microwave Pans Differ?
When selecting a pan, you must determine if your usage patterns align with residential or industrial standards. The “wrong” choice can lead to premature coating failure or inefficient kitchen workflows.
Comparative Overview: Home vs. Commercial Use
| Feature | Home Use (Residential) | Commercial Use (Industrial) |
|---|---|---|
| Usage Frequency | 1–3 times per day | 20–100+ times per day |
| Material Build | Lightweight Aluminum/Silicone | Heavy-duty Carbon Steel/Ceramic |
| Durability | Moderate (1–2 years) | High (Long-term heavy use) |
| Handle Design | Stay-cool silicone or plastic | Integrated or heat-resistant metal |
| Dishwasher Safe | Usually yes | Generally hand-wash recommended |
| Price Point | $25 – $60 | $80 – $200+ |
Which Material Is Best for Your Microwave Crisper?
The material composition of the pan dictates its heating speed, heat retention, and longevity.
Ceramic-Coated Aluminum
This is the most common material for premium home pans. The aluminum core ensures rapid heat distribution, while the ceramic coating provides a non-stick surface that is PFOA and PTFE-free.
- Pros: Lightweight, excellent non-stick properties, easy to clean.
- Cons: Ceramic can chip if handled roughly.
Carbon Steel with Susceptor Bottom
Often found in high-end commercial models, these pans are built for endurance. They retain heat longer, allowing for back-to-back cooking cycles without losing temperature.
- Pros: Extremely durable, professional-grade searing.
- Cons: Heavier and often requires specific “seasoning” or careful maintenance.
Silicone-Rimmed Crisper Plates
Commonly used for microwave pizza pans, these have a metal base with silicone edges for easy handling.
- Pros: Affordable, safe to touch, great for frozen snacks.
- Cons: Not suitable for high-heat searing of meats.
What Size and Shape Should You Choose?
Size is not just about how much food you can fit; it’s about microwave clearance.
Measure Your Internal Dimensions
Before purchasing, measure the internal width and depth of your microwave.
- Turntable Clearance: The pan must be able to rotate freely without hitting the walls. If your microwave is small (under 0.7 cu. ft.), look for a 9-inch pan.
- Height Clearance: If the pan comes with a lid (essential for steaming or preventing splatter), ensure it fits under the ceiling of the microwave.
Square vs. Round
- Round Pans: Ideal for microwaves with turntables. They ensure even heating as the pan rotates.
- Square/Rectangular Pans: Better for microwaves with a “flatbed” design (no turntable) or for specific items like bacon and paninis.
Why Is the Lid Design Important?
A microwave frying pan is often sold as a system including a lid. The lid serves two primary functions: moisture control and splatter protection.
Vented vs. Non-Vented Lids
- Vented Lids: Essential for frying. They allow steam to escape, which prevents the food from becoming soggy.
- Pressure-Sealing Lids: Used for “microwave pressure cooking.” These are great for stews but terrible for frying or browning.
Material Choice for Lids
- Glass Lids: Allow you to monitor cooking progress without opening the door.
- Metal-Shielded Lids: Some advanced pans use lids that actually block microwaves from hitting the top of the food, forcing all energy into the base for a more intense “bottom-up” sear.
How to Evaluate Heat Distribution and Performance?
A high-quality microwave frying pan should provide uniform heat. Cheap models often suffer from “hot spots” where the susceptor material is unevenly applied.
The “Bread Test” for Evaluation
To test a pan’s performance:
- Place a slice of white bread on the pan.
- Microwave for 60 seconds.
- Check the bottom. An even, golden-brown surface indicates high-quality heat distribution. Dark burnt spots or white unheated areas indicate a low-quality susceptor.
Pre-heating Requirements
Most professional-grade microwave pans require a pre-heating phase (usually 2–3 minutes empty) to reach the necessary temperature for searing. Check if the manufacturer’s instructions support pre-heating; if they don’t, the pan may not get hot enough to truly “fry.”
What Are the Safety Standards to Look For?
Safety is paramount when using metal-based components inside a microwave.
- Arcing Protection: Ensure the pan is specifically engineered for microwaves. Traditional metal pans will cause arcing (sparks) and destroy your magnetron.
- BPA and PFOA Free: For health safety, ensure the non-stick coating does not release toxic fumes at high temperatures.
- Non-Slip Feet: For commercial environments, pans with silicone feet or stable bases prevent the pan from sliding on the glass turntable.
How to Maintain Your Microwave Frying Pan for Longevity?
To protect your investment, follow these maintenance protocols:
- Avoid Metal Utensils: Use silicone or wooden spatulas to prevent scratching the susceptor coating.
- Hand Wash Recommended: Even if labeled “dishwasher safe,” the harsh chemicals in dishwasher tabs can degrade the browning plate’s efficiency over time.
- Thermal Shock Prevention: Never plunge a scorching hot pan into cold water. Allow it to cool naturally to prevent warping.
FAQ
Does a microwave frying pan really crisp food?
Yes, it functions by converting microwave energy into thermal heat via a susceptor base. This allows the pan to reach temperatures exceeding 200°C, enabling the Maillard reaction which creates a crispy, browned exterior on foods like pizza, gyoza, and sandwiches.
Can I use metal utensils on the pan?
It is highly discouraged. Most microwave pans feature a specialized non-stick or ceramic coating. Using metal forks or spatulas will scratch the surface, potentially causing “arcing” in the microwave and ruining the pan’s non-stick properties and heating efficiency.
Is it safe to use a metal pan in the microwave?
Only if it is a “microwave-rated” frying pan. These are designed with rounded edges and specific materials that prevent the accumulation of electrical charges. Never use a standard stovetop frying pan in a microwave, as it will cause fire and permanent damage.
How do I clean a burnt microwave frying pan?
Soak the pan in warm water with mild dish soap for 15 minutes. For stubborn residue, create a paste of baking soda and water, apply it to the area, and gently scrub with a soft sponge. Avoid abrasive steel wool, which destroys the heating base.
Why is my microwave pan not getting hot?
This usually occurs if the pan is not compatible with your microwave’s wattage or if the susceptor material has degraded. Some pans also require a 2-3 minute pre-heating cycle (while empty) to reach the necessary frying temperature. Always check the manufacturer’s wattage recommendations.


